

What if the most important part of installing a veranda happens before you open the kit? A level, suitable base and a clear plan make the assembly sequence easier to follow and help you spot problems before work begins. If you’re researching how to install a veranda, start by checking the site, fixing points and access for large or glazed components.
Every system has its own components and assembly requirements, so there isn’t one sequence that suits every veranda. Read the instructions for your chosen kit before unpacking it. This guide covers the main stages, from checking and preparing the site to organising components and assembling the structure, so you can plan the work methodically.
Some decisions, including the fixing method and roof type, depend on the specific system. Glass and polycarbonate options can have different components and handling requirements, so use the current documentation for your kit. Prepare carefully, follow each stage in order and arrange enough help for components that are difficult to handle safely.
Key Takeaways
- Measure the proposed position and check the access, ground and clearances before unpacking the kit.
- Compare delivered components with the product documentation and plan a clear route for moving long parts.
- Choose an attached or detached layout, and a glass or polycarbonate roof, to suit the site and intended use.
- Learn how to install a veranda by following the kit’s assembly sequence and checking alignment at the stages shown in its instructions.
- Inspect the finished structure against the product documentation and keep the assembly records for future reference.
Before you install a veranda: check the site, design and permissions
Preparation makes the installation easier to plan. Before assembling a veranda kit, check where it will sit, how it relates to your home and garden, and whether the site suits the system you’ve chosen. These checks can reveal access or ground issues before components are unpacked. They also give you a clear starting point for following the product’s instructions.
How to assess the veranda location and base
Measure the proposed footprint and compare it with the dimensions and clearances in the product documentation. Check nearby doors and windows, paths, garden boundaries and anything that could obstruct the structure or its use. A simple plan showing the footprint, key measurements and nearby features can help you identify clashes before work starts.
- Check for uneven ground or changes in level across the footprint.
- Mark obstacles and drainage routes that could affect positioning or access.
- Plan a clear route for carrying components from their storage point to the work area.
The base must be stable and suitable for the selected system. Ground conditions and fixing requirements vary by site and product, so don’t assume an existing patio or other surface is suitable without checking the manufacturer’s guidance. The wall condition and fixing points also need to suit the chosen system. Resolve any uncertainty about the base or fixings before assembly begins.
Which veranda layout and roof system suits the site?
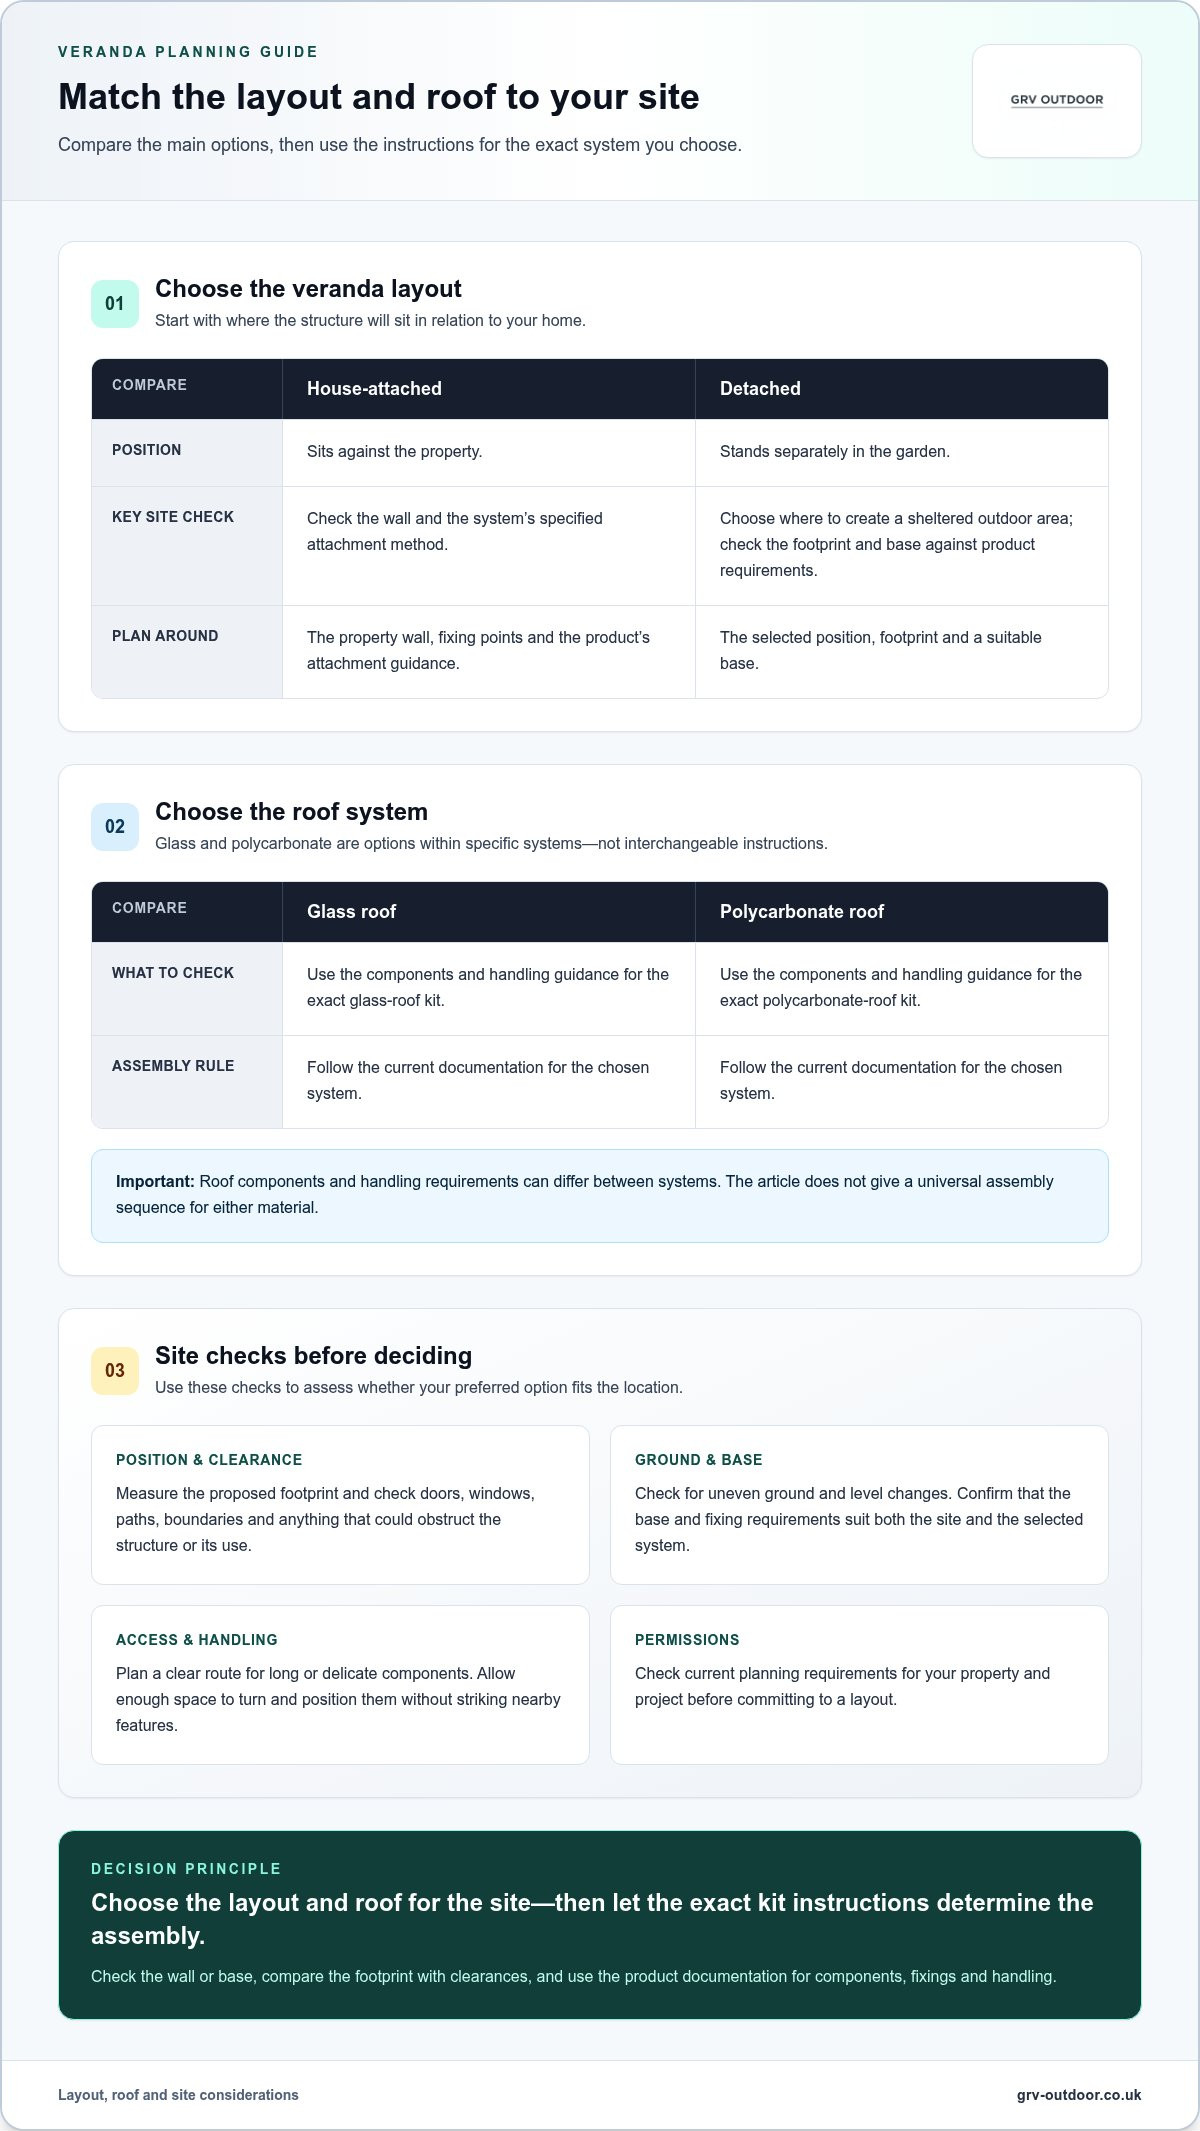
A house-attached veranda sits against the property, so its position must work with the wall and the system’s specified attachment method. A detached garden veranda stands separately, giving you more choice about where to create a sheltered outdoor area. Its footprint and base still need to meet the product requirements. For general context on the structure itself, see What is a Veranda?
Choose glass or polycarbonate as part of the system, not as interchangeable materials with identical instructions. Roof components and handling guidance can differ, so use the documentation for the exact kit. GRV’s range includes glass and polycarbonate roof systems, as well as the Ribolla Detached Veranda. Match the layout and roof to the site, then follow the relevant product instructions during assembly.
Check planning requirements before committing to a layout. Rules can depend on the property and project, so don’t rely on assumptions based on another veranda or a general online summary. Review current guidance for your circumstances and consult the UK veranda planning permission guide as part of your preparation.
Once you’ve considered the position, base and permissions, you’ll have a clearer plan for preparing the kit and work area.
Prepare the veranda kit, tools and work area before assembly
With the site planned, prepare the kit before assembly starts. An organised set-up makes it easier to identify parts, follow the sequence and avoid repeatedly moving long or delicate components. Use the current documentation for your specific veranda system as the reference. Similar-looking kits can have different parts, connections and assembly methods.
Check the components and instructions
Read the instructions from start to finish before unpacking or assembling anything. Compare the delivered components with the parts list and diagrams. Identify structural members, roof elements, connectors and finishing parts where included. If a part is unclear or an item on the list appears to be missing, pause and resolve the discrepancy before building around it.
Keep the instructions accessible and group components by the stages shown in the manual. Place labelled parts together on a clean, protected surface, and keep small connectors contained so they don’t get mixed up or lost. Don’t assume every GRV system has identical contents or assembly details. The documentation for your chosen kit takes priority.
Plan tools, handling and working conditions
Tool requirements depend on the system and the site. Check the manual for the exact tools and any specified access or safety equipment instead of relying on a generic list. You may need measuring and marking tools, hand tools, suitable powered tools and protective equipment. Have the required items ready and keep the work area clear enough to use them safely.
Plan the route from the delivery or storage point to the installation area. Move long components carefully, with enough space to turn and position them without striking walls, glazing or garden features. Arrange help for parts that are awkward to manage alone. Don’t drag components or leave them where they could be damaged or create a trip hazard.
- Clear the route of tools, packaging and garden furniture.
- Set components down on a clean, protected surface, following the product guidance.
- Pause if wind or rain makes lifting, carrying or positioning parts unsafe.
Choose a dry, settled period where practical. Weather can affect grip and control, particularly when handling large panels or long structural parts. Don’t press on to meet a timetable if conditions make the work unsafe. Wait until you can handle the components safely and follow the product instructions.
If you’re still checking project permissions, the UK planning permission guidance for England and Wales is an official starting point. Once your documentation, components and work area are ready, you can focus on the assembly sequence. To compare options for your project, explore GRV veranda systems.
Choose an installation approach for your veranda layout and roof
The layout and roof material affect how you plan the work, but they don’t create a universal assembly method. A veranda attached to a house has different positioning and connection considerations from a detached structure. Glass and polycarbonate systems also have their own panel handling and fitting instructions. Use this comparison to identify what to plan for, then follow the current documentation for your chosen system.
| Layout | Site considerations | Assembly considerations |
|---|---|---|
| House-attached | Position the structure in relation to the wall, doors and windows, and check that the planned footprint suits the space. | Use the product-specific details for the connection to the property. Alignment at the wall and the relationship between components must follow the system instructions. |
| Detached | Choose a position with suitable access and space around the structure, and plan the base for its intended footprint. | Assemble as a freestanding layout using the specified component arrangement and fixing method. Don’t assume its sequence matches an attached design. |
Attached or detached veranda: what changes during installation?
An attached design meets the house, so access to the wall and accurate positioning against the property are central to planning. Connection details depend on the system. Don’t adapt instructions for another model or assume the wall provides a suitable fixing point. A detached veranda, such as a design intended to stand in the garden, needs its position and base planned independently. For related permission considerations, consult the glass room planning guidance.
Glass or polycarbonate roof: plan for different handling
Roof material affects handling and assembly, but it doesn’t determine which system is easier to install. Glass and polycarbonate panels may require different care, orientation checks and fitting steps. Before lifting a roof element, read the instructions for the selected kit and identify how each panel should be positioned. Keep track of the documented orientation as you work, so panels aren’t turned or fitted in the wrong sequence.
Dimensions, connections and fixing methods vary by product. A general guide can help you understand the decisions involved, but it can’t replace the assembly instructions for your specific veranda. If the manual differs from general advice about how to install a veranda, follow the current product instructions. Stop and check the documentation if a component or connection doesn’t match the illustrated sequence.
Consider the layout and roof together. Look at the available space, access for assembly and the system’s documented requirements, then plan around the exact components supplied. This keeps your preparation relevant to the veranda you’re building rather than a generic design.
How to install a veranda kit: follow the assembly sequence
The steps below provide a practical framework, not a substitute for the instructions supplied with your kit. Systems differ in their components, connections and fixing methods. Follow the current product manual for the exact order, tools and methods. Don’t continue if the parts or site don’t match its guidance.
Set out and assemble the main structure
Start with the prepared base. Check it against the product requirements, then mark the layout using the dimensions and positions specified in the documentation. Accurate setting out gives you a reference for the structure and helps reveal a mismatch before assembly progresses.
Assemble the main sections in the order shown for your chosen kit. At the checkpoints identified by the manufacturer, pause to check alignment and stability before moving on. Don’t assume a sequence from another veranda system applies to yours.
Fit the roof and complete the connections
Orient and fit roof panels as directed in the manual. Check each panel’s position before securing it, then follow the specified steps for the joints, profiles and finishing details. Use only the components and methods identified for your system. Don’t substitute a fixing or sealing product based on general advice.
- Confirm the starting point. Check the base and marked positions against the instructions before placing structural components.
- Build the frame. Assemble the structural sections in the documented order, using the specified connections.
- Check alignment. Pause at the manual’s inspection points and correct any discrepancy before proceeding.
- Fit the roof elements. Confirm panel orientation, then position and secure each element as instructed.
- Complete the details. Check connections, joints and finishing parts against the assembly guide.
Keep the installation safe throughout
Use suitable protective equipment and follow the handling precautions in the product documentation. Plan each lift before moving a large or awkward component, keep the work area clear, and avoid working in conditions that make handling unsafe. Structural fixing and roof fitting are safety-critical tasks. Follow the manufacturer’s instructions throughout.
Stop if something doesn’t match. A part that differs from the diagram, an unexpected fixing point or a change in site conditions can affect the next step. Don’t force components into position or improvise a connection. Recheck the documentation and resolve the uncertainty before continuing. General guidance on how to install a veranda can’t determine whether a specific structure or fixing is suitable for your site.
Work methodically and complete each check before moving to the next stage. The exact assembly sequence is product-specific, so keep the manual close at hand from the first mark to the final connection. To plan a project around a system designed for your space, explore GRV veranda options.
Inspect the finished veranda and plan your next steps
Before using the veranda, inspect it against the product drawings and the manufacturer’s completion guidance. This isn’t a substitute for checks specified in your manual. It’s a practical way to catch visible issues, confirm the assembly is complete and keep a record of the system for future reference.
What to check before using the veranda
Compare the finished structure with the supplied drawings. Check that visible components appear correctly positioned and that connections and finishing details match the assembly guide. Look for loose, displaced or visibly misaligned parts, but don’t guess at acceptable tolerances or make adjustments beyond the instructions.
- Check the visible alignment of the assembled structure against the drawings.
- Look over accessible connections, joints and finishing parts.
- Confirm the manual’s final inspection steps are complete.
- Note anything that looks damaged, loose or inconsistent with the instructions.
If you spot a concern or can’t confirm that an assembly step is complete, don’t use the structure until the issue has been resolved in line with the product guidance. Record what needs attention rather than attempting an improvised repair.
Keep the product record and plan any additions
Store the assembly instructions, drawings and product details together in a safe place. Record the system identification details shown in your documents, and keep any assembly or final-check notes with them. This makes it easier to find the correct guidance if you need to inspect, maintain or adapt the space later.
Side walls or glazing are separate design choices, not components to assume are included with every veranda kit. They can change how open or enclosed the space feels, so consider their intended use and compatibility with the structure before planning an addition. GRV’s range includes polycarbonate side walls and glass sliding doors. The outdoor glass sliding doors guide explores enclosure options. Treat additions as separate from the original assembly unless the product documentation explains how they fit into the system.
A methodical final check brings the project to a clear stopping point: you’ve compared the structure with its documentation, stored the records and can consider any future changes separately. If you’re planning another outdoor space, explore GRV’s veranda range at your own pace.
Make your next outdoor-living decision with confidence
A veranda can shape how you use the garden, from creating a sheltered place to dine to making a comfortable transition between indoors and out. Before moving from planning to assembly, decide how you want to use the space and choose a system that suits it. Keep the product instructions central to your project: they set out the components and methods for your specific kit.
GRV designs and manufactures outdoor structures, with modular veranda and roof system options for different projects. Delivery and installation services are available across the United Kingdom. Explore the designs and consider which one complements your home and the way you want to enjoy your garden.
Explore GRV's veranda systems and plan your outdoor space. Choose a design that fits your project and use its product guidance to plan the next steps.
Frequently Asked Questions
Do I need planning permission to install a veranda in the UK?
Not always, but whether permission is needed depends on the proposal and property, so there isn’t one answer for every UK home. Check current guidance and your local planning authority’s advice before ordering, particularly if the property has a special designation or other restrictions. Planning rules differ across the UK, so don’t rely on a neighbour’s veranda as precedent. Keep any written guidance with your project records.
Can I install a veranda on an existing patio or decking?
Possibly, but an existing patio or deck isn’t automatically suitable for your chosen veranda. Check its condition, footprint and levels against the system’s requirements, and make sure the proposed fixing arrangement is compatible with the surface. For decking, don’t assume the boards alone provide a suitable base. If you can’t establish that the existing surface meets the product guidance, pause and resolve that before starting assembly.
How long does it take to install a veranda kit?
There’s no reliable fixed installation time for every kit. The work can vary with the system, roof type, site access, preparation needed and the installer’s familiarity with the instructions. Build your schedule around the product manual rather than an online estimate. Allow time to check components and complete each stage carefully. Don’t start a stage if you’ll have to rush or leave components in an unsafe position.
Can one person install a veranda kit?
Only if the product instructions and the task make solo handling safe. Some components may be awkward to position without assistance, and roof fitting or structural work can involve safety-critical handling. Check the manual for any stated handling requirements before deciding who will help. If a component can’t be moved or held securely by the people available, don’t attempt to lift it alone or improvise a support method.
What tools do I need to install a veranda?
The exact tools depend on the kit, so use its current manual as your checklist before buying or unpacking equipment. Measuring and marking tools such as a tape measure, spirit level and pencil may be useful for setting out, alongside the hand or powered tools specified for assembly. Protective equipment may also be required. Don’t substitute a tool or fixing method if it differs from the product instructions.
Can I install a veranda in wet or windy weather?
Pause if rain or wind makes access, lifting or positioning unsafe. Wet surfaces can make movement more hazardous, whilst gusts can make large components harder to control. Judge conditions at the work area, not just the general forecast, and follow any weather-related instructions supplied with the system. Wait for conditions that allow you to handle and secure components safely. Don’t carry on in poor conditions to save time.
What should I do if the ground is not level?
Don’t force the frame into alignment or compensate with improvised packing. Recheck the site and compare the level differences with the base requirements in your kit’s documentation. The base may need to be prepared or adjusted to meet those requirements before assembly can begin. If you can’t confirm that it’s suitable, stop and resolve the issue first. Starting on an unsuitable base can affect later positioning and connections.